Facebook is in the top 3 most visited sites in the world, after YouTube and Google. 2.23 billion people log in every month to scroll through their feeds, catch up with old friends and check out their favorite brands.
It’s estimated that 78% of Americans have discovered retail products using Facebook.
It’s no wonder so many businesses are setting up Facebook pages as a primary sales and marketing tactic.
However, just having a Facebook page isn’t enough. It needs to be visually engaging to grab people’s attention when they first click on your page. It’s your cover photo – sometimes known as your Facebook banner- that will give gives them the first impression of your brand.
Getting the sizing right is one of the most important things. Not least because Facebook makes it so easy to get wrong.
And getting it wrong could be costly. It could make your cover photo look weird, and turn your audience off for good.
My ultimate guide to Facebook cover photo sizing will show you why size matters, and how to get it right to give your audience the best impression of your brand from the get-go.
Read Facebook’s guidelines before you start
Before you even start on your cover photo, familiarize yourself with Facebook’s guidelines. These will keep you on the right side of Facebook’s rules before you even begin so that you don’t run into any problems further down the line.
For example, a few issues Facebook raises are:
-
- Cover photos cannot be “deceptive misleading or infringe on anyone’s copyright”.
-
- Your cover photo “must not include a verified checkmark, and also must not include third-party products, brands or sponsors”.
-
- Your cover is public.
- You cannot encourage people to upload your cover image to their personal timelines.
The penalty for violating any of this points? Facebook could “take action”. They don’t exactly say what they’d do, but it’s likely they’d at least take down your Facebook Page.
The guidelines also provides a link to cover photo sizing and dimensions. We’ll get to this a bit later.
Why Facebook cover photo size matters
Your cover photo size is important simply because it’s the first impression most people will be getting of your brand.
If you don’t adhere to Facebook’s image dimensions and your picture is too small, Facebook will stretch it to fit the space. Or, if your image is too large, parts of it will be cropped out.
It’ll look weird, and will undo any good your page is trying to achieve.
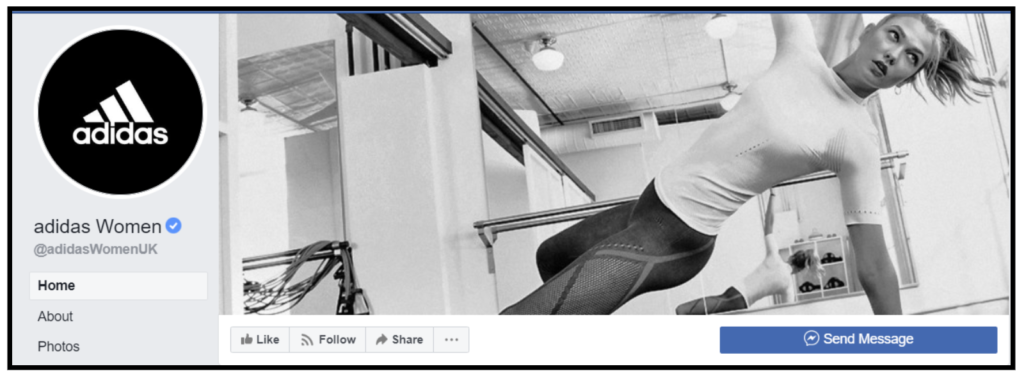
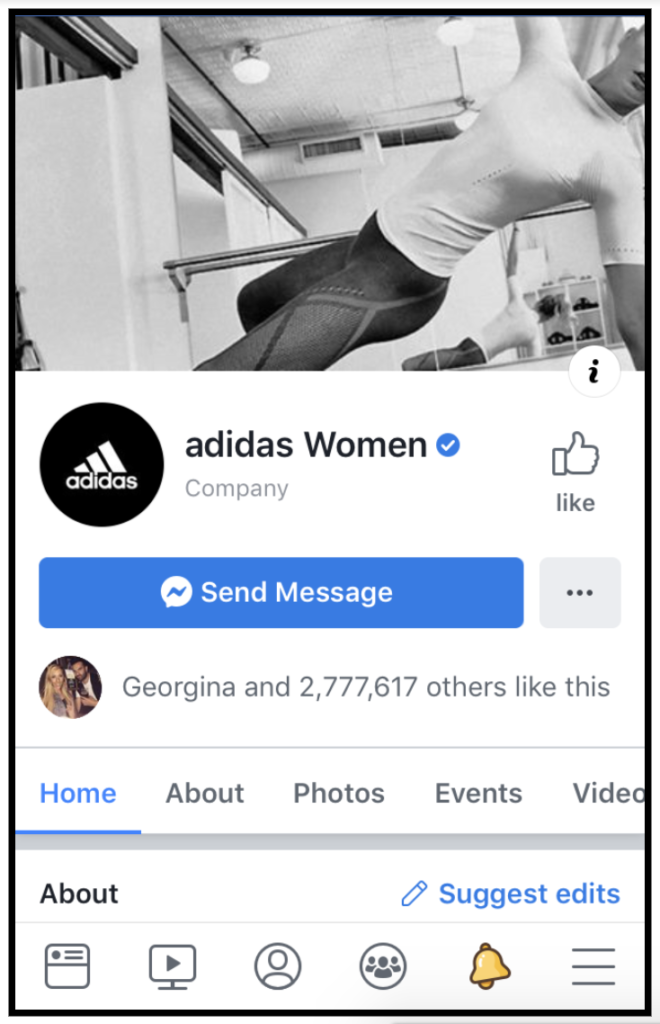
To demonstrate how a cover photo can look great on one desktop but lose out on a mobile screen, here’s an example of Adidas Women’s Facebook cover photo.
The first example is how it looks on a desktop. No sizing problems at all.
But in the screenshot of how it looks on a smartphone, parts of the image has been cropped out.
No, it’s not the end of the world. But in a world where visuals are everything, it pays to get your cover photo sizing right.
Know the right Facebook cover photo size
Facebook cover photo size
Facebook stipulates that your cover image should:
-
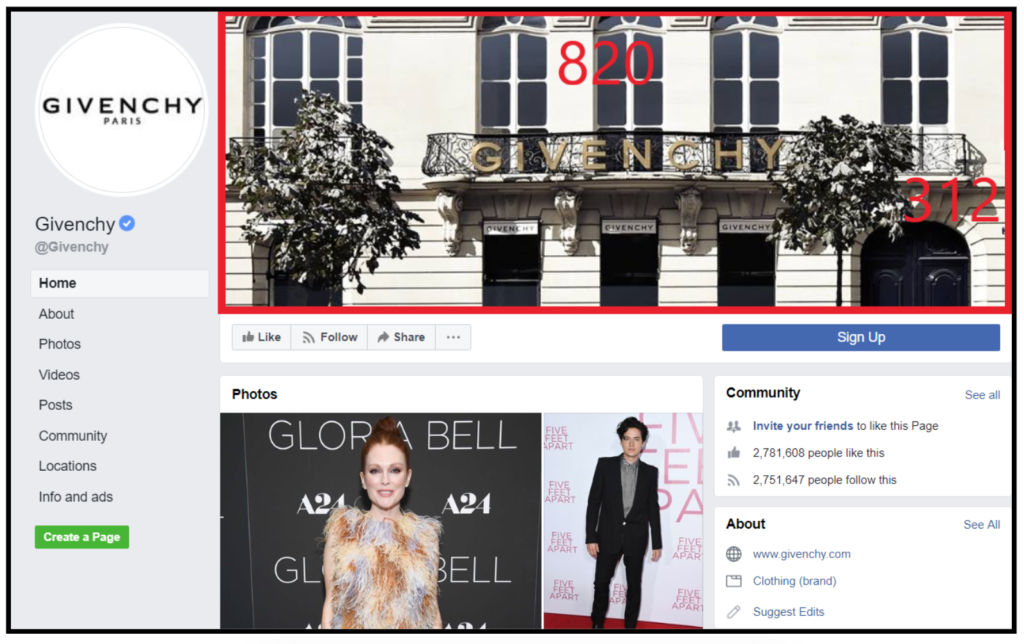
- Display at 820 pixels wide by 312 pixels tall on computers.
-
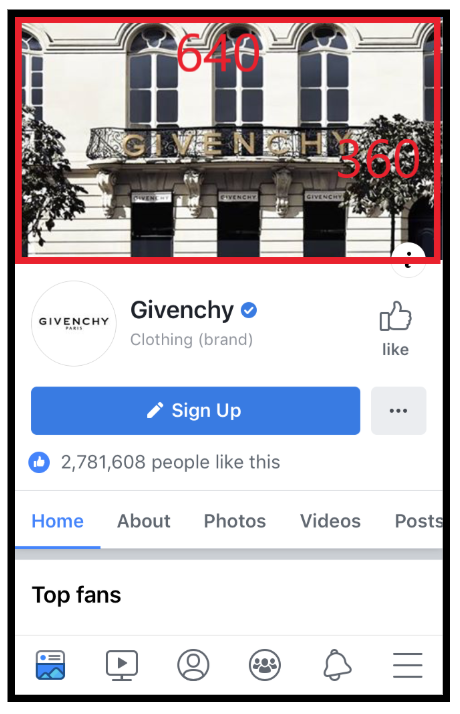
- Display at 640 pixels wide by 360 pixels tall on smartphones.
-
- They must be at least 400 pixels wide and 150 tall (or they won’t upload at all).
-
- They load fastest as a sRGB JPG file that’s 851 pixels wide, 315 pixels tall and less than 100 kilobytes.
- Cover photos that include a logo or text are best uploaded as a PNG file.
Clear as mud, huh?
What makes the Facebook cover photo size guidelines so confusing is that it talks about pixels, whereas actually what it really cares about is the SHAPE of the image.
So on a desktop, the image is displayed as a short and wide rectangle, whereas on a mobile screen it’s more like a square.
And what’s more frustrating is that you can’t upload a cover image for desktop and then for mobile. Instead, you have to find an image size that will display well in both formats, being ready to forego parts of the whole image depending on which device it’s displayed.
And then there’s the jargon, so let’s unpack that before we go any further:
Facebook cover photo sizing jargon
What is a pixel?
A pixel – also known as a picture element – is the smallest unit of a digital image or graphic that can be represented on a digital display device (laptop, desktop, mobile, TV, billboard etc).
Pixels are combined to form a complete image, video or text that appears on a computer display.
What is an sRGB JPG file?
A JPG – or JPEG – file is an image file type. JPEG stands for Joint Photographic Experts Group, who were the people who invented the standard.
sRGB is the color profile that pertains to the JPG file. So if you’ve created your image in Adobe PhotoShop or Lightroom using the RGB color profiles, then you’ll need to convert these to sRGB color profile so that its image quality is consistent for digital media.
What is a PNG file?
A PNG file is an image file type. PNG stands for “Portable Networks Graphic”, and are often larger in size than other forms of image, like JPEGs or GIFS. They’re good for logos, because they let the image be overlaid on any background.
Why does speed matter?
Facebook states that cover images load fastest when they’re a sRGB JPG file that’s 851 pixels wide, 315 pixels tall and less than 100 kilobytes.
This means that, it’s small enough a file size that it doesn’t slow down the page load speed, but big enough to appear in a good resolution.
Displaying your cover photo on desktop vs mobile
Facebook states that your cover image must “display at 820 pixels wide by 312 pixels tall on your Page on desktops and 640 pixels wide by 360 pixels tall on smartphones”.
This means that, when you upload your cover image, Facebook will use it in 2 ways:
- A large rectangular format of 820 x 312 pixels which will appear on bigger screens like desktops and laptops.
2. A smaller 640 x 360 pixels version for smartphone screens:
To get the best chance of being displayed well for both desktop and mobile, the size Facebook recommends is 851 x 315 pixels.
And because the ratios for desktop and mobile cover photo sizes diverge, every photo will display differently. On mobile, they display taller and narrower than on a desktop screen, at a 16:9 ratio.
Facebook won’t stretch an image to meet the mobile or desktop dimensions though, so if you get your dimensions wrong then your photo won’t get distorted. Instead, they’ll crop a bigger desktop cover photo to fit the mobile dimension guidelines.
This all means that it’s always best to upload your cover photo so that it’s optimized for desktop rather than mobile, because it’s less likely to be cropped unfavourably than if you uploaded it mobile-first.
The mobile safe area
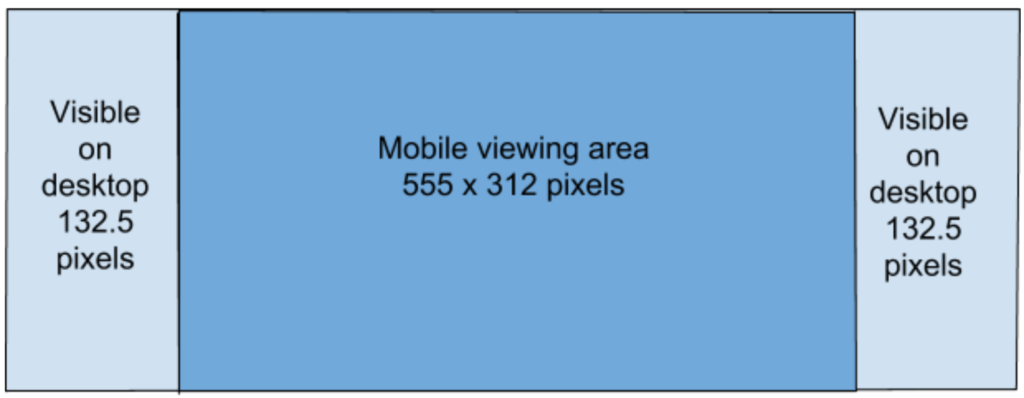
The dimensional ratio for desktop cover photos is 205:78, and for mobile it’s 16:9. So, because you’re uploading your images with desktop dimension requirements in mind, you need to consider the mobile viewing area of these images.
More specifically, if you upload a 820 x 312 pixel cover image for desktop, then the equivalent mobile viewing area of this image is about 555 x 312 pixels:
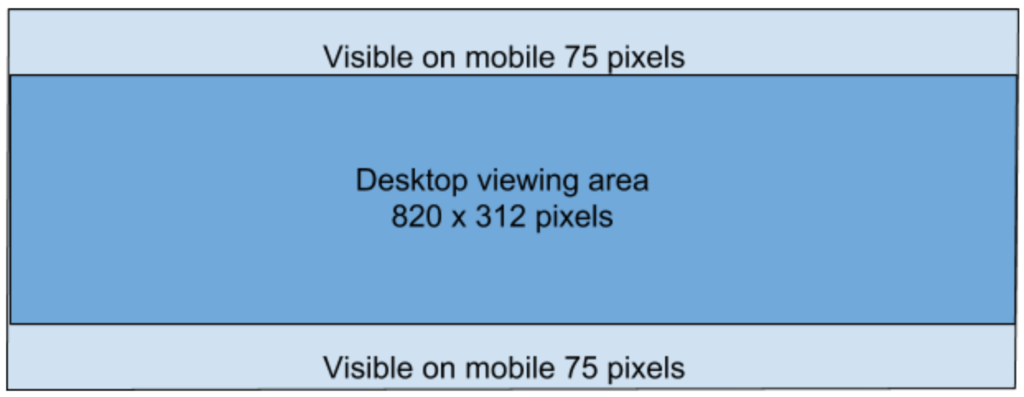
Or you could choose to design your desktop cover image at the mobile ratio of 16:9, or 820 x 461 pixels. However, taking this option will mean that Facebook will crop the image to remove to and bottom sections to meet the desktop display requirements of 820 x 312 pixels:
The bottom line: the best size for your Facebook cover photo
To make sure your Facebook cover photo is the right size, you should design it in the optimal cover photo dimensions that ensure it displays well both on desktop and mobile.
The best quality, highest resolution image for your Facebook cover photo is 820 x 360 pixels. If your images is this specific size then it will display well on both desktop and mobile, so that when it’s cropped, it won’t lose any important information.
How to resize your images
So now you know what your size your Facebook cover photo should be, here’s how you reach that size.
Choose your tool
Choosing the right tool depends on your budget, but also how much creative control you want over your design.
Adobe Photoshop is the go-to tool for designers, but for occasional use it’s probably not worth the investment at between $160 and $785 per year.
Pixlr is a good free alternative to Photoshop, with many of the same functionalities. It’s an online tool, so you don’t need to download any software, apart from the Flash plugin. There is a Pro version, at $22 per month, which allows some extra features including more templates and a large stock image library.
Resizing your image using Pixlr
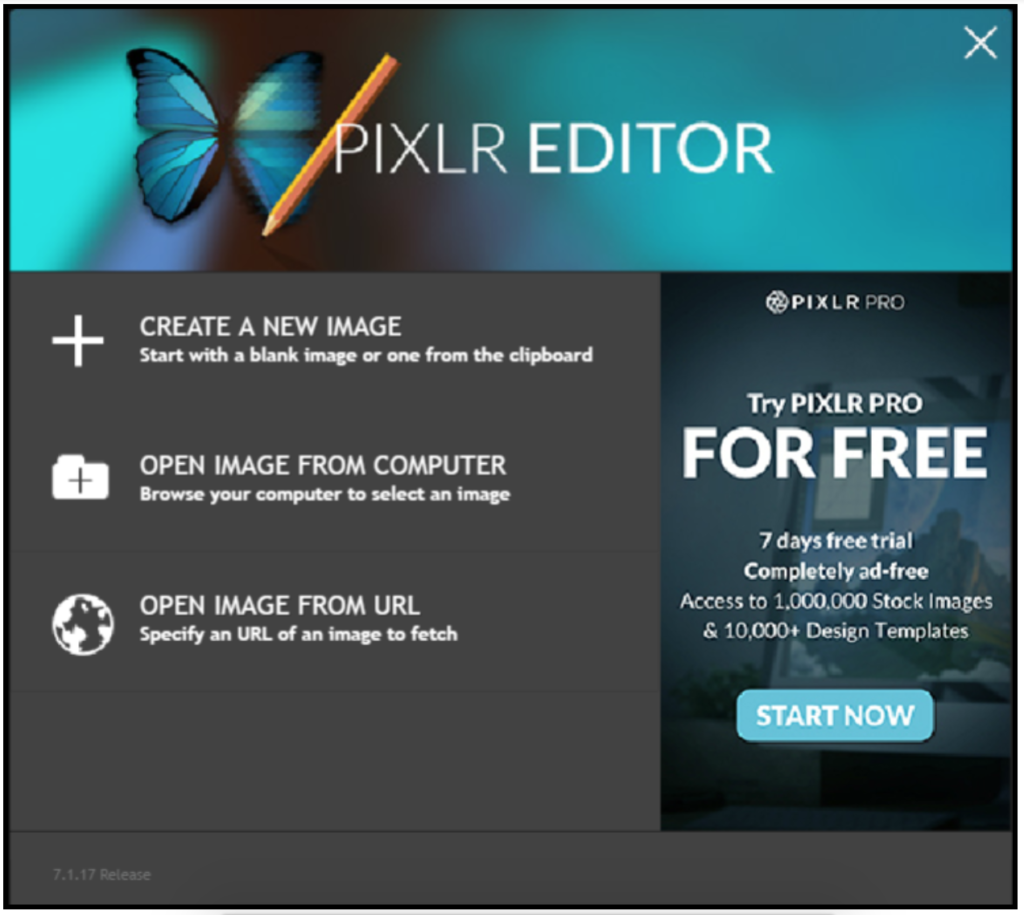
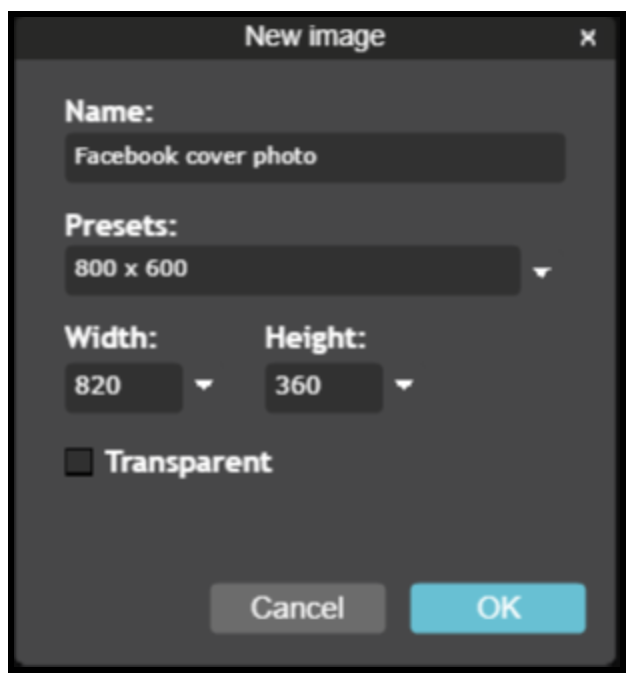
In the editor window, choose “Create a New Image”:
Set your dimensions to 820 x 360 pixels and click “Ok”. This will set your background to be the correct dimensions for your Facebook cover image.
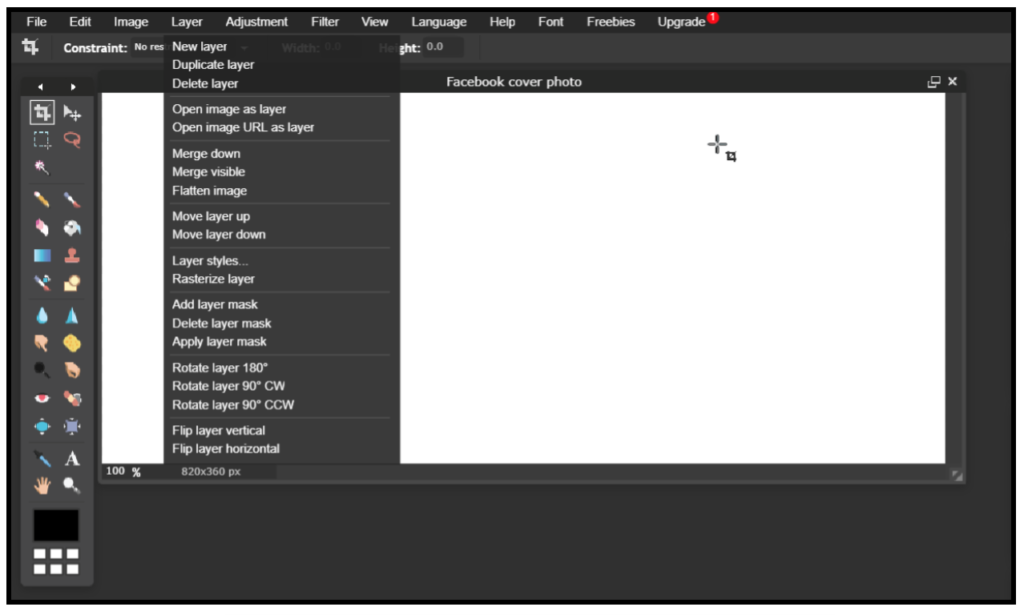
To upload your cover photo, go to the “Layer” tab at the top, and choose “Open image as a layer”. You can then upload an image from your device.
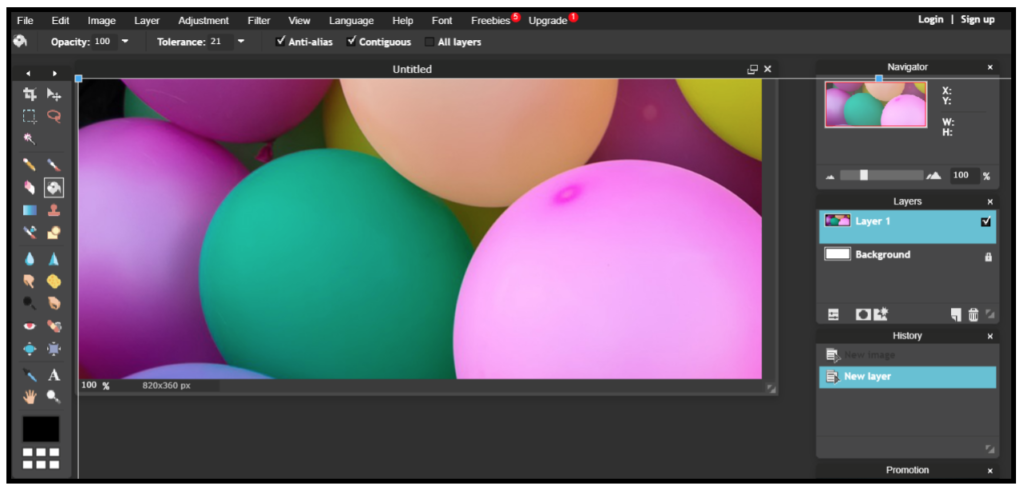
When you upload your image, it will probably be much larger than your background layer.
To shrink it to fit the space, choose the “Free transform” tool under the “Edit” tab and, holding down the Shift key, manipulate the image to shrink it to fit the space.
Holding down the shift key ensure it keeps the right aspect ratio and doesn’t look stretched or warped.
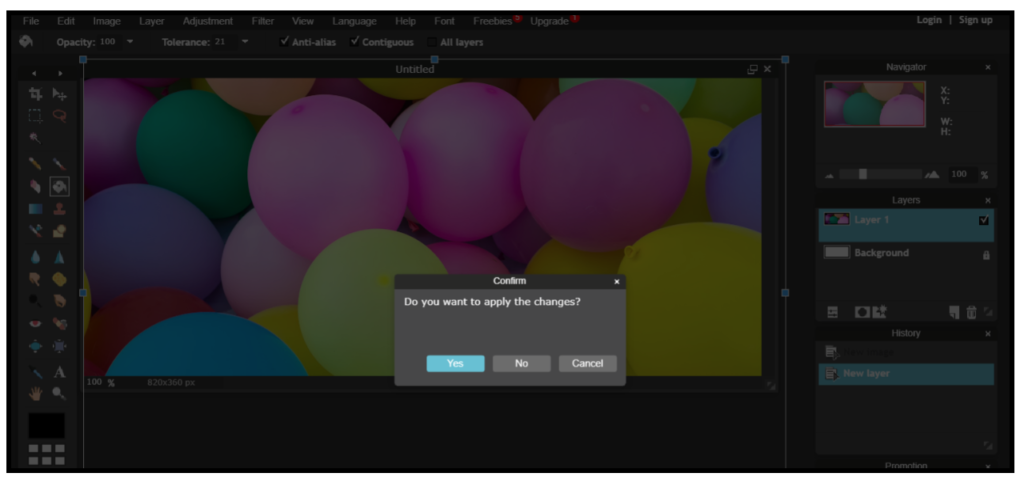
When you’re happy with the image as it appears in the 820 x 360 dimensions, click away from the image, where you’ll then be asked to save the image.
Save your image as a PNG file.
If you’re happy to resize your images yourself then that’s great. Thankfully though, there are plenty of tools out there offering templates to work from. And most of them are free.
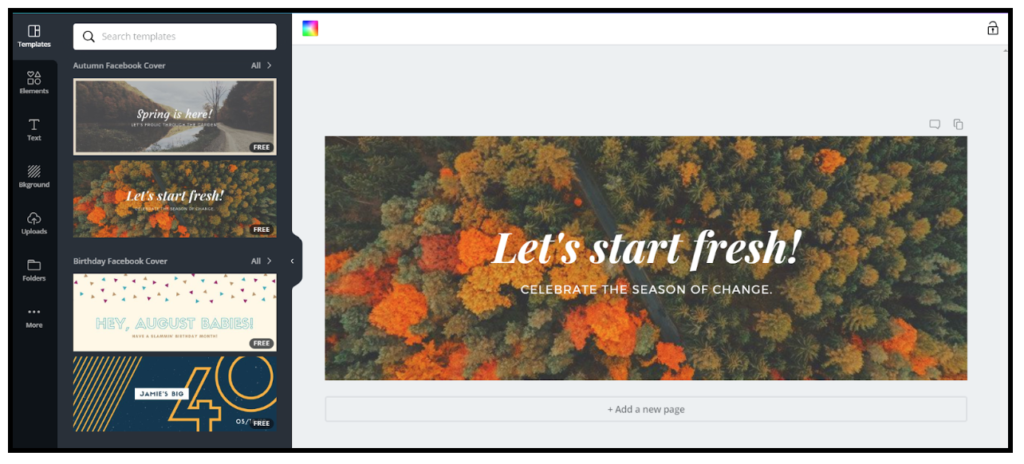
Canva is user-friendly online tool, with a free price plan which gives most non-designers enough functionality to work with.
It offers specific Facebook cover photo templates so you don’t even need to worry about sizing your images. Just click on “Facebook Cover”, and your template will be the right size and dimensions before you even begin.
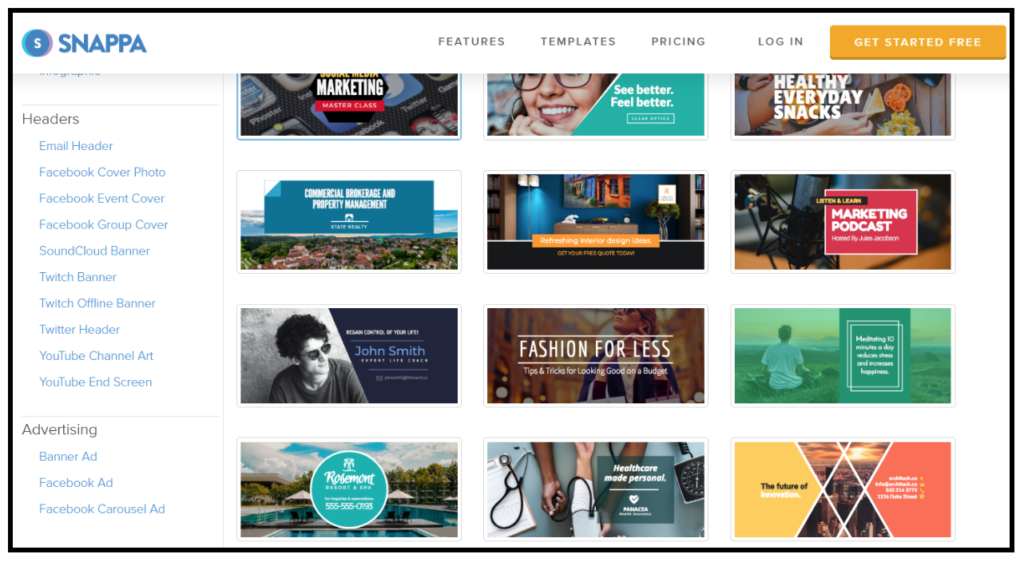
Snappa is a similar design tool, offering a large range of templates. You can choose from up to 150 (pretty stylish) Facebook cover photo templates on their free price plan.
Creating your Facebook cover photo with Snappa
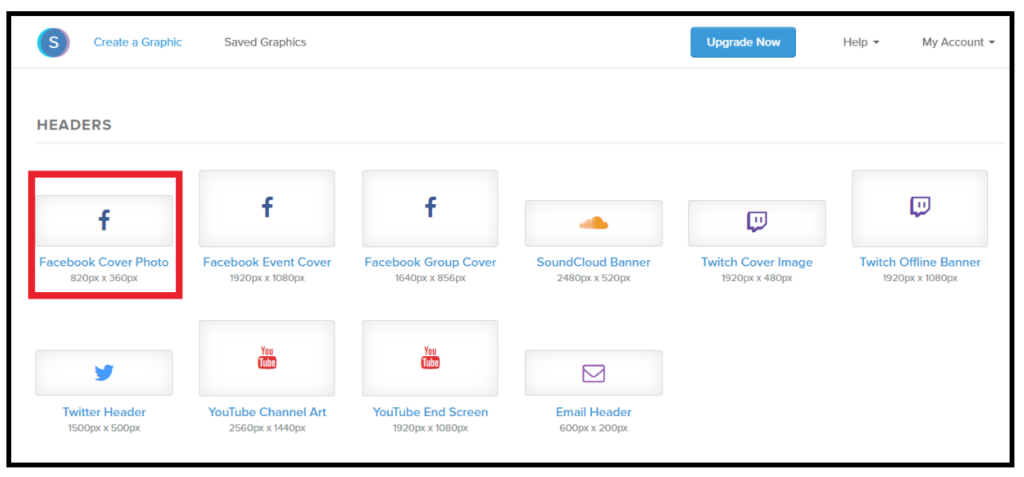
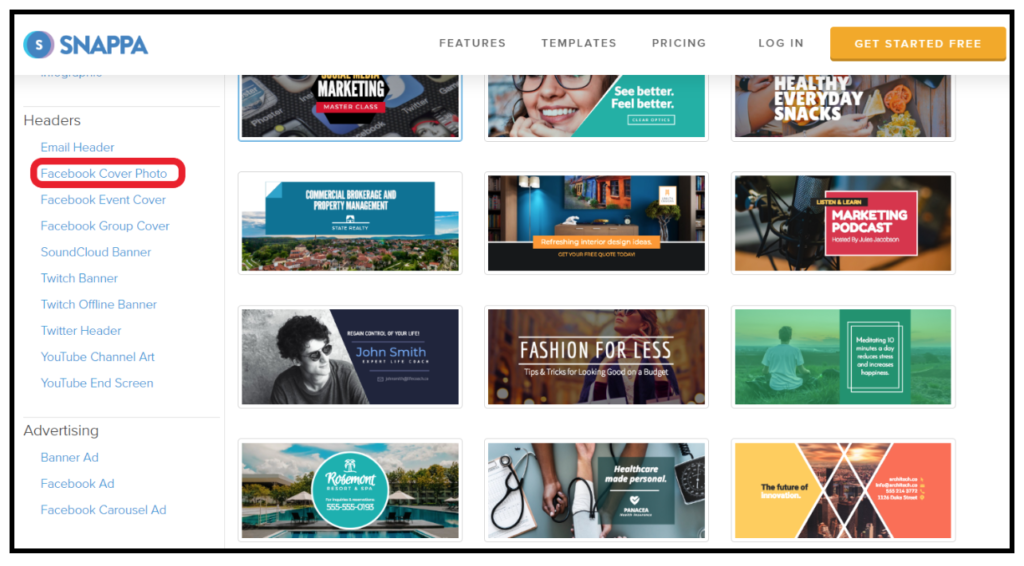
On the Snappa homepage, click on Facebook Cover under Headers.
Then choose a template from which you want to design your cover image:
At this point, you’ll be asked to register an account. Or, if you already have an account, you’ll need to sign in.
You’ll now be at your editor page, where you’ll be able to see your template.
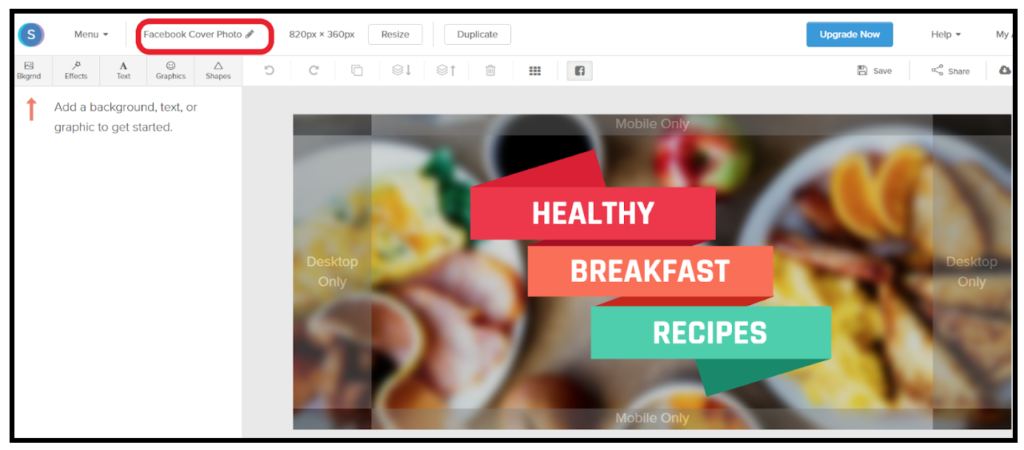
Helpfully, Snappa shows you which parts of your image will be displayed on desktop and which on mobile. This way, you can ensure that the most important parts of your design are within the area that displays on both desktop and mobile.
First off, name your cover photo in the top left of the editor:
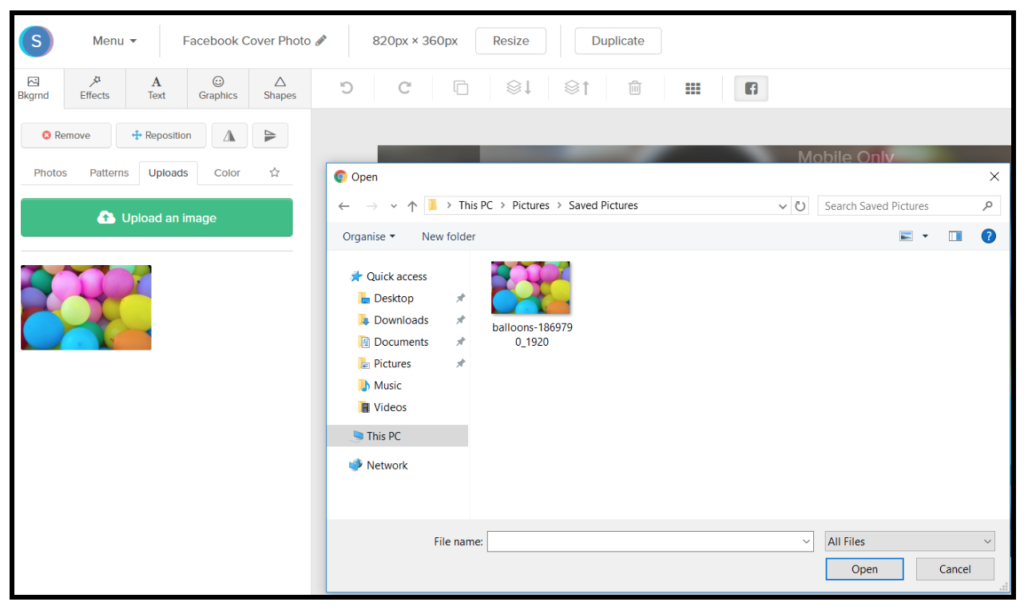
Next decide on your background. You can stick with the image provided in the template, or use your own.
I’d recommend taking full control of your cover photo, and uploading your own background image. That said, they do offer a large library of images which is worth browsing through if you don’t have images of your own.
And, even if you’re using a template you can still upload your own image, or choose swap the image to another image from Snappa’s free image library.
To do this, head to “Background” in the left hand tab. and you can either choose from a number of templates or upload an image from your device:
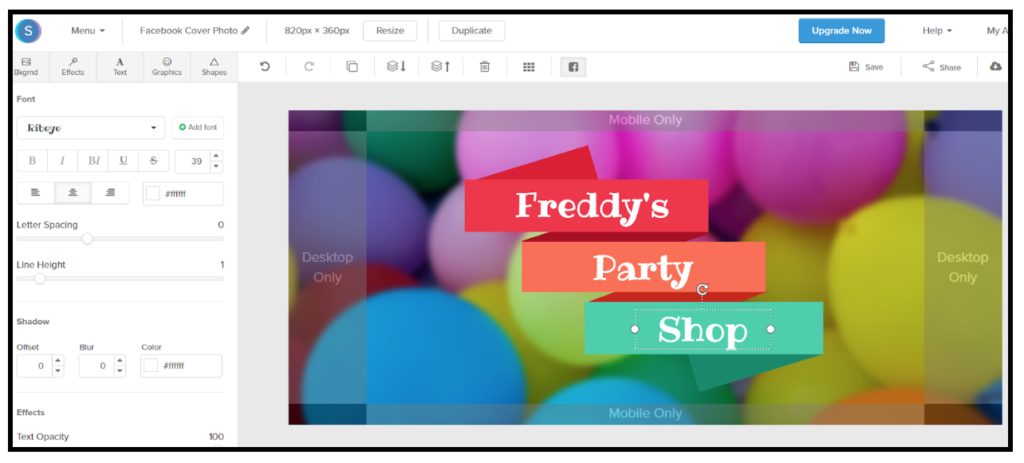
You can now begin to add layers of text, graphics effects and shapes to create the cover photo you want. Just drag and drop them across to your cover image, change the opacity to suit, and decide on which layer to place them.
When you’re happy with your cover photo, click on “Download” on the top right hand corner, and then save it to your computer.
Uploading and testing your Facebook cover photo
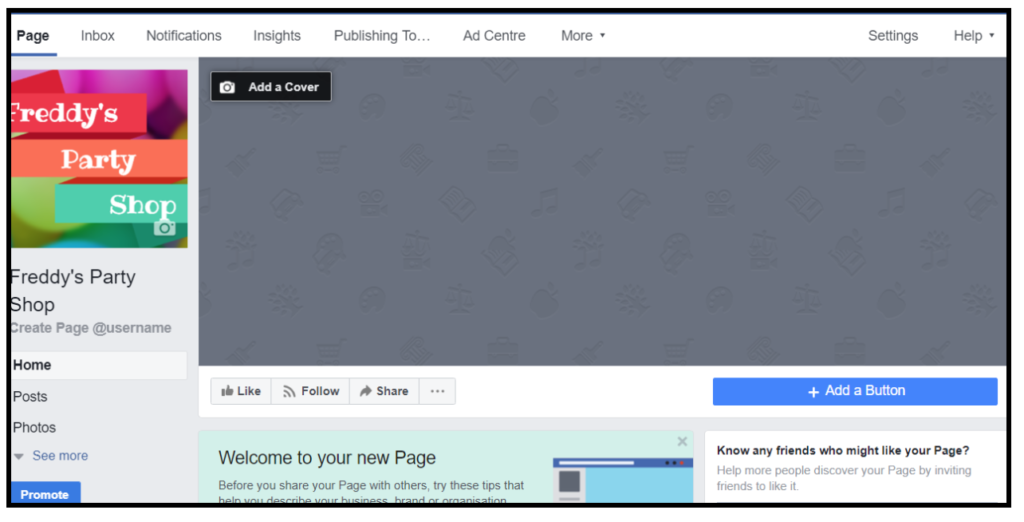
First, go to your Facebook page:
Next, click on “Add a cover”, and choose “Upload photo/video”, where you’ll be asked to choose a file from your computer.
Once you’ve uploaded your image, you can drag your image so that it fits well in the space using the repositioning tool.
Click “Save” and you’re done.
To make sure your cover image sizing is correct, check in to your page on a desktop, laptop, tablet and smartphone. You need to double check that no important information has be cropped out of your image, or that your image has been stretched to fit the space.
More tips for achieving a killer Facebook cover photo
Be consistent with your brand
If someone arrives at your Facebook page and doesn’t know what you do right away, then you’ve done something wrong.
Your cover photo is the first thing people see, and should be communicating what your brand does.
Brands who do best with their cover photos tend to keep their photos in keeping with their corporate colours. They’ll also make sure their image doesn’t distract or confuse the audience, but also has an impact.
Right align focal points to offset your logo
Because of how your cover photo appears on your Facebook page, your eye is drawn to your logo on the left of the page. Offset this by weighting your cover image’s content to the right hand side.
It’s a minor design point, but it does create more balance to the page.
Minimize text and stay visual
While your cover photo should be communicating your brand, it should be highly visual.
That said, some text is no bad thing. Just choose your wording carefully to send the right kind of message, whilst keeping it to a minimum.
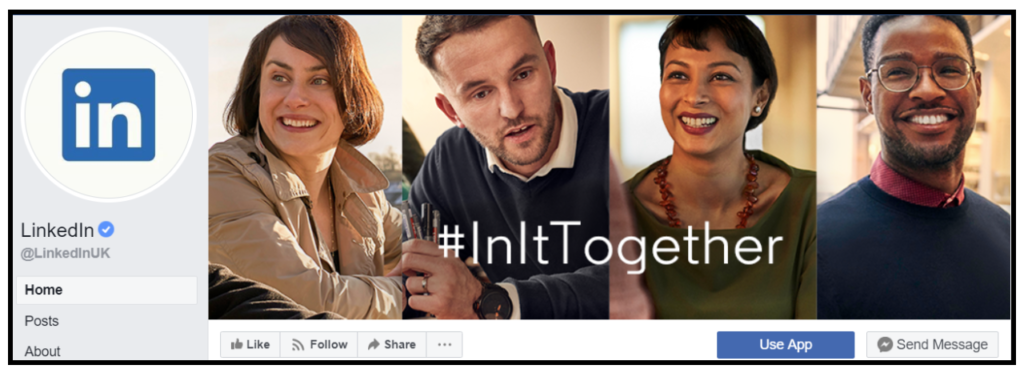
LinkedIn’s Facebook page cover photo is highly visual, using four faces to form a connection with the audience. Its clever hashtag #InItTogether is the only text that’s used, yet brilliantly communicates LinkedIn’s mission.
Change image to highlight different messages and incorporate a CTA
Some brands decide to change their cover image to communicate different messages at different times. Say they have a new product launch coming up, they’d create a new cover image to emphasize that.
However, rather than going into detail about it, use the call-to-action button in your cover photo to encourage people to find out more.
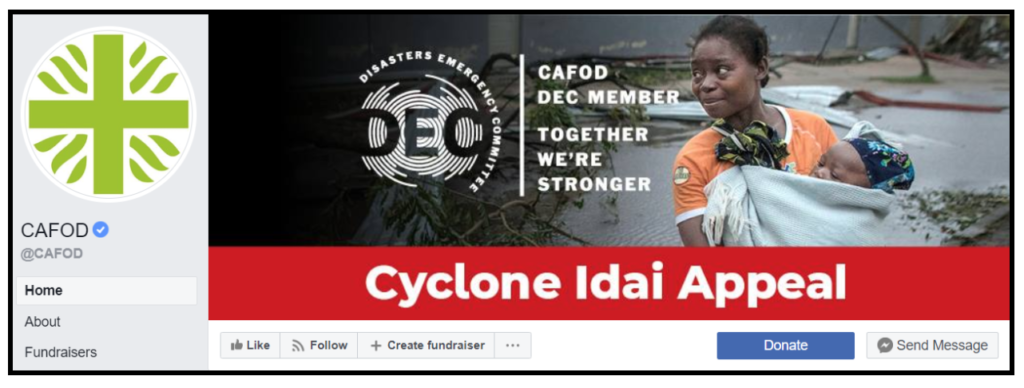
Check out global NGO, CAFOD’s recent Facebook cover photo. Here they’re their latest emergency fundraising appeal in response to cyclone Idai in Southern Africa.
It’s straightforward, visual yet informative, and leads logically towards the “Donate” button below the image.
Make the most of your cover photo description
Adding a description helps you to explain a bit more about your CTA, if you’ve used one.
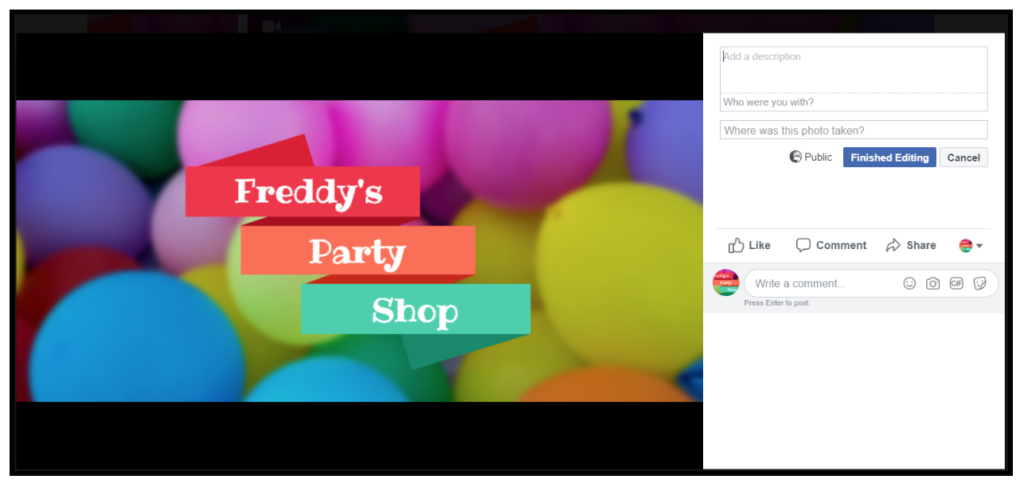
Adobe uses their cover photo descriptions well, with this example showing them give extra context around their cover video:
When you provide a cover photo description, make sure you include the link to which your CTA is directed. This means that whenever someone sees your cover image directly, they’ll be able to access the link.
In summary
Your cover photo is the first thing people see when they land on your Facebook page.
If done well, it will have an impact, and will encourage people to take some kind of action, whether than be to follow your page, or even to click on your call-to-action to shop directly with you.
But getting the sizing wrong can severely damage its impact. If your image isn’t the correct dimensions then it risks being blurry, or cropped, losing its integrity when it’s displayed on screen.
As we’ve seen, Facebook don’t exactly make their sizing regulations easy to understand. DImension requirements are different on desktop or mobile display.
But thankfully, that doesn’t really matter, because there are so many great tools out there that give you a Facebook cover template from which to work. If you don’t have a design background, these tools take care of pixels, dimensions and ratios for you!
Having said that, for more proficient designers, using a design tool like Adobe Photoshop and Pixlr will give you more creative control over your image.
Whatever process you follow, whatever tool you use, the bottom line is to test your Facebook cover photo as soon as you go live.
Test it on as many different devices as you can get your hands on. But as a bare minimum, because the overwhelming majority of Facebook users are on their smartphone, make sure it’s at least optimized for mobile.
Image source: Pixabay


